Configuration example for using the VoIP SIP driver with an AVM Fritz!Box with CapiFax
This example shall explain how to configure a VoIP CAPI driver on an AVM FritzBox (network side ISDN or All-IP connection) and how to operate a fax server in interaction with CapiFax without using an ISDN card.
However, the instructions can also help to configure another device instead of the FritzBox like a PBX with SIP accounts or a router from LanCom with SIP accounts support. This applies to PBXs such as those from Auerswald, Agfeo or even 3CX. For these, step 1 is done analogously, i.e. an IP extension is set up for the fax server. Step 2 and the following then apply unchanged. You need the IP of the router and the generated user name and password for the SIP extension.
Configuration of the Fritz!Box
Settings menu Telephony >Telephony devices:
This manual was created with Fritz!Os 7.03. Make sure that your Fritz!Box has at least this version, otherwise features may differ.
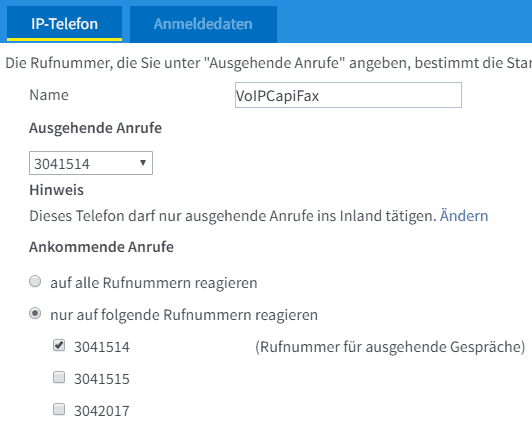
Create a new telephony device, give it a meaningful name like “VoIPCapiFax”. Assign the correct outgoing and incoming numbers to this device.
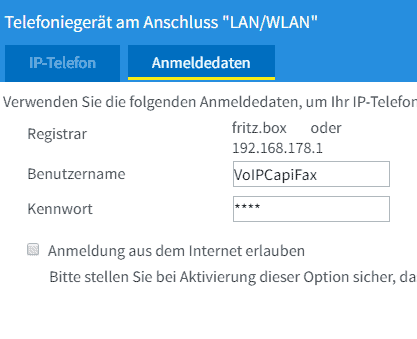
Under “Login data” enter again “VoIPCapiFax” as user name for a better overview and choose a suitable, good password.
The option to log in to this account from the Internet is best left disabled for security reasons, it is also unnecessary for using CapiFax.
It is no problem to activate multiple phone numbers for incoming calls, the same phone numbers can then also be used for active dialing. Current Fritz!Os versions support the SIP elements P-Called-Party-ID and P-Asserted-Identity for this purpose. This allows you to use multiple fax numbers with one SIP account.
The following setting is also important to be able to use Fax T.30:
In the “My Numbers” menu under “Connection Settings”, open the hidden menu for “Change Connection Settings” at the bottom and deactivate the option “Fax transmission also with T.38”. At least for now, T.38 does not work: If this option is enabled, the Fritz!Box would convert outgoing faxes to T.38 and translate the transmission live.
VoIP CAPI driver configuration
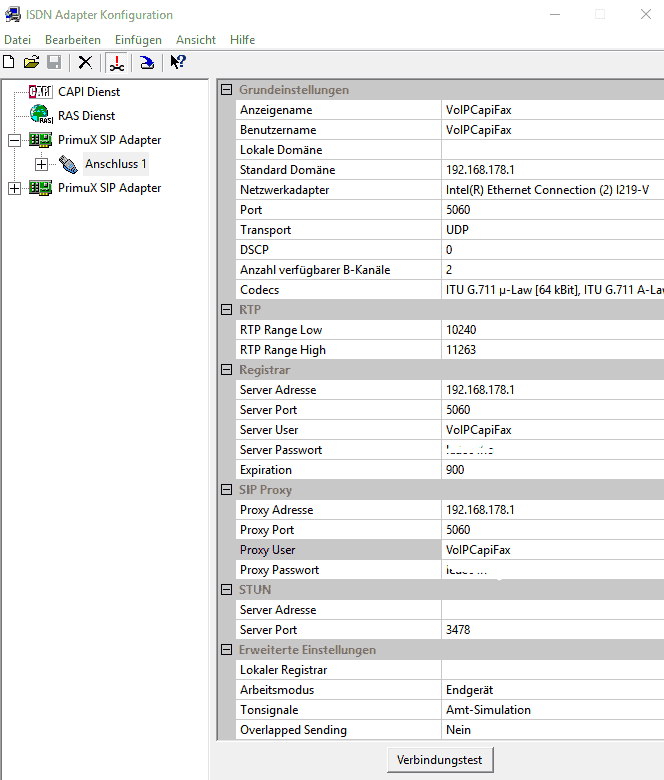
After installing the VoIP-CAPI drivers, open the PrimuX-CAPI configuration. Select the menu item “Insert”> “PrimuX SIP Adapter”. Then enter the SIP user data created in the Fritz!Box as follows:
Enter the user name created in the Fritz!Box in the following fields: “Display name”, “User name”, “Server user” and “Proxy user”, and the password accordingly.
Configuration of CapiFax Fax-Servers
Now create an MSN in the CapiFax server configuration for each phone number you have assigned to your SIP account in the Fritzbox. Depending on the provider, you may have to enter the area number without area code (Telekom) or a complete phone number (e.g. SipGate). Use the number as it is displayed in your Fritzbox under “Incoming calls”.
If you have created more than one SIP controller, create an entry in the CapiFax startup window for each controller created and assign an account to it. The option “Ignore controller on receive” (available from CapiFax V5.10) is necessary if you have created more than one SIP controller in PrimuX-Capi.
It is recommended to restart the computer each time you change the SIP account data or make corrections in the CAPI SIP configuration, so that you can be sure that the new data is also activated and used.